
This time, I would like to share a small script that will allow you to turn on -when is turn off- your Ubuntu 18.04 LTS (Bionic Beaver) Data Science home server from anywhere in the world.
Difficulty: Super Easy.
Time consuming: About 5 minutes.
Cost: Free (Open Source Licensing).
Goal: To turn on your home server remotely from anywhere in the world.
Why Wake-on-LAN? Sometimes, we are on the road. And if you are like me, you might perform Data Science projects from a Chromebook -or low specs laptop- through a secure SSH connection. My custom-built Data Science server currently runs docker images, RStudio Server, Jupyter Notebooks, SAS, Python, and many other valuable tools. These tools help me analyze data and code directly on my “home cloud” by using any browser. This approach is impossible to do if the server is not turned on.
Requirements
Setup
Modern Linux distros such as Ubuntu 18.04 have WakeOnLan configured in NetworkManager.
The following info provides a starting point.
- target interface:
eno1( in your case you could seeeth0instead) - target PC static LAN IP:
192.168.1.100 - target MAC:
00:11:22:33:44:55<- Your Server’s Mac Address - target public WAN IP:
1.2.3.4<- Your Server’s IP address - public WoL port forward:
10009
Target interface
To know your target interface, run the following command from the terminal.
ip a
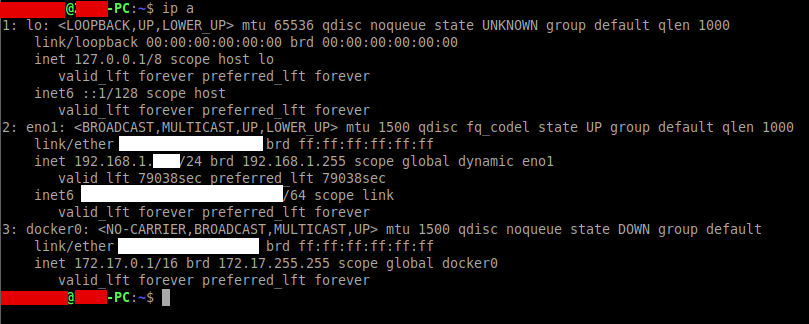
In my case, it list eno1. You might see something different on your system. For security reasons, I have not listed the information returned from my Data Science server.
Steps needed in Data science server
The steps for preparing your Data Science server for Wake on LAN (wol) are as follows:
1 - Install ethtool.
sudo apt-get install ethtool
ethtoolis already installed in the Ubuntu Server 18.04 LTS.
2 - Listen Magic Packets by replacing
sudo ethtool -s <YOUR_TARGET_INTERFACE> wol g
# sudo ethtool -s eno1 wol g # <- This is the correct setup for my Data Science server
The above ethtool instruction, tell the network card to listen out for magic packets. The g denotes that it should listen for magic packets. The problem I faced, is that this solution isn’t persistent between shutdowns; so once the machine is powered down and then booted up again, the setting is lost.
3 - Create a new file called wol.service
Make sure to replace
sudo bash -c "cat > /etc/systemd/system/wol.service" <<'EOF'
[Unit]
Description=Configure Wake-up on LAN

[Service]
Type=oneshot
ExecStart=/sbin/ethtool -s <YOUR_TARGET_INTERFACE> wol g

[Install]
WantedBy=basic.target
EOF
4 - Run the following commands to enable the service to run on startup.
systemctl daemon-reload
systemctl enable wol.service
systemctl start wol.service
That’s it, Wake-on-LAN from BIOS has been successfully setup on your Data Science server. Now, you should be able to power off your machine and then wake it up with a magic packet.
Target PC static LAN IP
From the above print out, you can find your static LAN IP. It usually goes in the form 192.168.1.xxx, where xxx represents your Data Science server IP address.
Target MAC
You can find this info from the above report, next to link/ether; it has the following format:
00:11:22:33:44:55 brd ff:ff:ff:ff:ff:ff
Some times is composed of an alpha-numeric string of values.
Write this number down; it is required to have it handy if you’re on the go.
Target public WAN IP
You can find your Your Public IPv4 address by visiting https://www.whatismyip.com/.
Write this number down; it is essential to have it handy if you’re on the go.
Public WoL port forward
For this, you have to set up your router to do a port forward as follows:
from port 10009 to 192.168.1.xxx port 9
If you don’t know how to do this, noip.com provides a general guide that will help you setup Multiple Router Brands.
Now you are ready to turn on your Data Science server remotely or from your LAN.
Usage
Option 1
Wake PC on the same LAN using the terminal
With your Data Science server turned off, if you are on the same LAN network, and from a different computer, execute the following command from the terminal.
To install Wake On LAN, execute the following commands.
sudo apt-get update
sudo apt-get install wakeonlan
Now, execute the following code to turn on your Data Science server.
wakeonlan 00:11:22:33:44:55 # MAC Address
Make sure to use the MAC address of the Data Science server as given above.
Wake PC remotely using the terminal
To Wake On LAN from anywhere in the world, execute the following command from the terminal.
wakeonlan -i <PUBLIC WAN IP> -p 10009 <MAC ADDRESS>
For the above to work, you must know your public WAN IP address. The IP address is given by https://www.whatismyip.com/.
Make sure to have it annotated, alongside your Data Science server MAC Address before you leave your home.
Option 2: From the web browser
If you don’t have a laptop or PC running Linux, you can visit w3dt.net Wake On Lan tool and turn it on from there.
Conclusion
That’s it; now you should be able to wake on LAN from anywhere in the world using a laptop running Linux or from a web browser.
I hope this tutorial helps you as much as it has helped me.